Flight Test
This section covers the intial flight testing actions that I performed.
Calibrate Compass
The compass only needs to be calibrated once though you should repeat it if you make significant changes to the drone that might affect the compass.
Power on the quadcopter. Use the transmitter to quickly switch between GPS mode and Manual mode until the LED changes to a constant orange/yellow which indicates the start of the horizontal calibration. I find that I need to perform the switch combination 11 times to enter the calibration mode.
Keeping the quadcopter flat rotate it horizontally around 360 degrees. Once the rotation is complete the LED should change to green which indicates the start of the vertical calibration. Now orient the quadcopter on its side and once again rotate it around 360 degress.
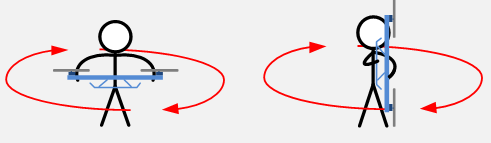
When the final rotation is complete the LED should return to its normal sequence for the current control mode.
Status LED
To start with I’ll typically be flying the GPS control mode so I wait until the status LED is showing a single green flash. It typically starts out with red flashes followed by a green and slowly the number of red flash dissappear as the better GPS satellite lock is achieved.
See the LED status chart below for the different indicators.

When operating in GPS mode I wait for the quadcopter to find the GPS satellites that cause it to show a single green flash.
Range Test
TBD
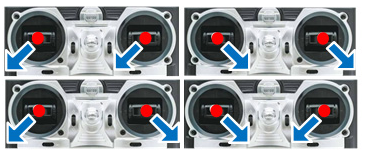
Starting the Motors
Use the Combination Stick Commands (CSC) to start motors. Simply pushing the throttle stick before takeoff will not start motors. You have to execute any one of following four Combination Stick Commands (CSC) to start motors.
Transmitter Failsafe Test
Power on the quadcopter and fly striaght up a metre or two. Turn off the transmitter which will trigger the receiver to go into the configured failsafe setting. I had previously configure the throttle setting to be about 30% which upon testing was too low as the quadcopter came down very quick. I need to set it to a value that causes the quadcopter to very slowly descend.
IOC Test
I have previously set the NAZA Failsafe Settings to “Go-Home and Landing”.
Out in the field power up the quadcopter and let it establish a home position lock. When an appropriate number (7+ according to DJI’s LED status overview, see the section above about the LED) of GPS satellite are detected the status LED flashes a single green flash on the LED status indicator.
The current position of the quadcopter will be automatically recorded as the home point when the throttle is first moved after 6 or more GPS satellites have been found.
The NAZA will record the current nose direction as forward direction at the 30th second after you power on the multi-rotor. The LED will blink a sequence of green flashes quickly when the home location is successful.
Once the quad has established the home position fly it some distance away, it doesn’t have to be far. The first time I tried it I only moved about 5m away.
In my configuration I use the ELEV D/R switch to move the control mode into Failsafe. Flick the ELEV D/R switch. The quad should go up to 20m and move back to the home location before descending.